Did you know that nearly 30 percent of renters lose part of their deposit due to cleaning issues during a move out? Leaving a spotless home is more than just about good manners, it can save you money and reduce stress. With the right plan and a smart checklist, transforming your space from lived-in to spotless becomes much easier. By taking an organised approach, you can avoid surprises and sail smoothly through your final inspection.
| Key Point | Explanation |
|---|---|
| 1. Start cleaning at least a week early | Begin cleaning before your move to manage tasks and reduce stress effectively. |
| 2. Declutter before you clean | Sort belongings into Keep, Donate, Recycle, and Trash to simplify the cleaning process. |
| 3. Use a top-to-bottom cleaning method | Clean from high surfaces to low ones to avoid dirt falling on already cleaned areas. |
| 4. Focus on tough stains and problem areas | Use targeted cleaning methods for areas like kitchens and bathrooms to ensure thorough cleaning. |
| 5. Document the cleaning process | Take photos of cleaned spaces for evidence in case of disputes over your deposit. |
Before you start moving out, gathering the right cleaning supplies and creating a strategic cleaning schedule will save you time and stress. According to Man with a Van Hithergreen, professional movers recommend starting your cleaning process at least a week before the actual move date.
First, collect all essential cleaning materials including an all-purpose cleaner, disinfectant, window cleaner, microfiber cloths, scrub brushes, vacuum, mop, and a sturdy pair of cleaning gloves. Pro tip: Consider having multiple sets of cleaning cloths so you can rotate them while working through different rooms.
Here’s a summary of essential cleaning supplies and their typical uses:
| Cleaning Supply | Main Use | Recommended Area |
|---|---|---|
| All-purpose cleaner | General surface cleaning | Kitchens Living areas |
| Disinfectant | Eliminate germs and bacteria | Bathrooms Kitchens |
| Window cleaner | Streak-free shine for glass | Windows Mirrors |
| Microfibre cloths | Dusting and wiping | All rooms |
| Scrub brushes | Removing tough stains and grime | Tiles Baths Sinks |
| Vacuum | Removing dust, hair and crumbs | Carpets Hard floors |
| Mop | Deep cleaning hard floors | Kitchens Bathrooms |
| Cleaning gloves | Protect hands from chemicals | All cleaning tasks |
Break down your cleaning tasks into manageable sections. Allocate specific time slots for each room or area. For instance, dedicate one evening to kitchen deep cleaning, another to bathroom sanitisation, and so on. This approach prevents overwhelming yourself and ensures thorough cleaning without last-minute panic.
Create a cleaning checklist and track your progress. Include specific tasks like wiping down surfaces, cleaning inside cupboards, scrubbing tiles, and addressing often forgotten areas like light switches and door handles.
![]() By systematically working through your list, you will ensure no area is left untouched.
By systematically working through your list, you will ensure no area is left untouched.
Remember, a well-planned cleaning strategy not only helps you get your deposit back if you are renting but also leaves the space in pristine condition for the next occupants. Your future self will thank you for the organised approach.
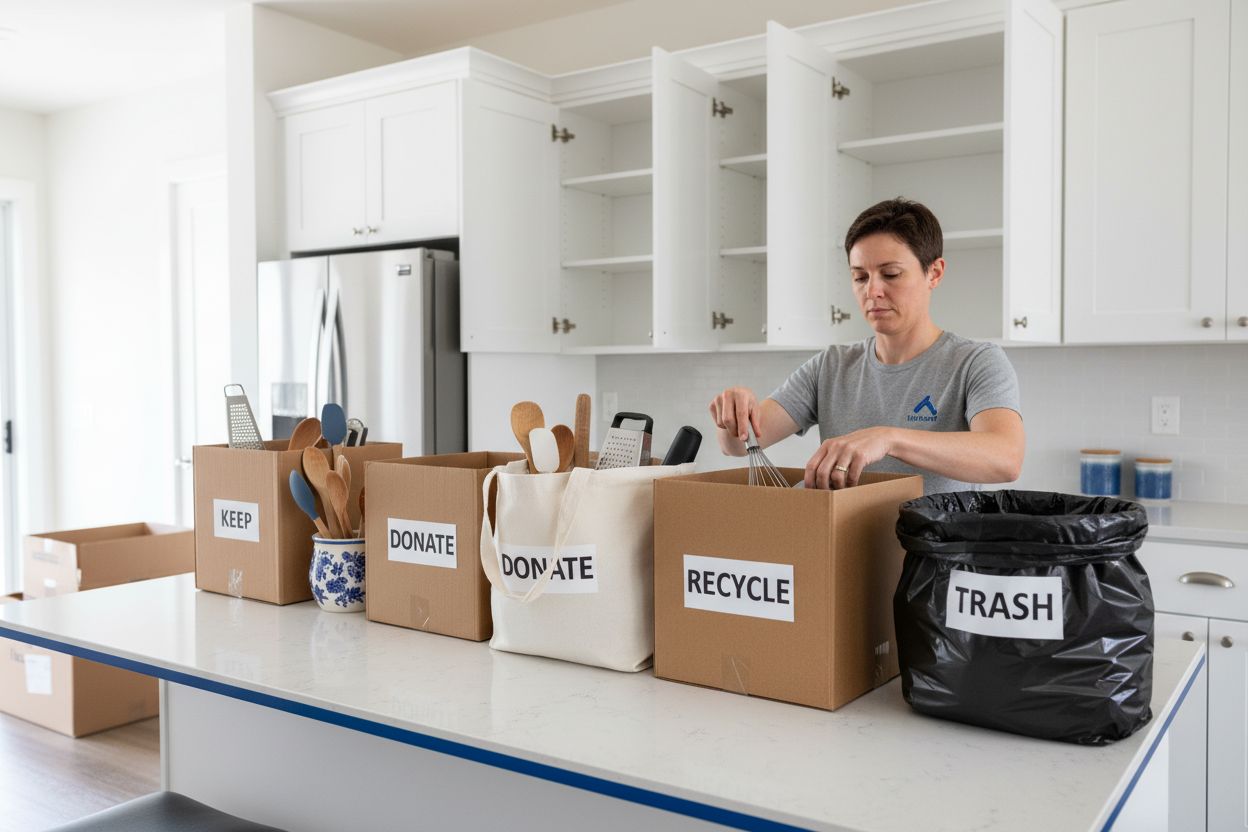
Decluttering transforms your moving cleaning process from overwhelming to manageable. According to Man with a Van Hithergreen, professional movers recommend sorting items into clear categories before starting your deep clean.
Start by gathering four large boxes or bags and label them Keep, Donate, Recycle, and Trash. Walk through each room systematically, making quick decisions about your belongings. Be ruthless. If you have not used an item in the past year and it does not hold significant sentimental value, it likely does not need to make the move with you.
In bedrooms, sort through clothing, remove items from wardrobes and drawers, and assess each piece critically. Kitchen spaces often accumulate expired food items, unused gadgets, and duplicate utensils. Clear out these spaces first to create more working room for thorough cleaning.
Focus on surfaces and hidden spaces. Check inside cupboards, under beds, and behind furniture. Remove all items to give yourself complete access for cleaning.
 This approach not only simplifies your cleaning process but also reduces the volume of items you will need to pack and transport.
Remember that decluttering is about making space not just in your home but in your life. By streamlining your belongings before moving, you create a smoother transition and start your new home journey with less baggage both literally and metaphorically.
Creating a systematic cleaning approach ensures you do not miss a single spot when preparing your home for moving out. According to Chelsea Self Storage, professional cleaners recommend a top-to-bottom strategy that prevents re-depositing dust on already cleaned surfaces.
Begin with the highest points in each room. Start by dusting light fixtures, ceiling corners, and wall surfaces using a microfiber cloth or extendable duster. As Man with a Van suggests, working from top to bottom means gravity becomes your cleaning ally debris will naturally fall downward as you clean.
Move next to windows, window frames, and baseboards. Wipe down these surfaces thoroughly using appropriate cleaning solutions. Pay special attention to areas often overlooked like door frames, light switches, and electrical outlets. These small details can make a significant difference in the overall cleanliness of your space.
Progress to furniture and larger surfaces. Clean shelves, tabletops, and countertops systematically. Remove items completely to clean underneath and behind them. In bedrooms, strip beds and clean mattresses. In living areas, move furniture to clean hidden spots that accumulate dust and grime.
Finish with floors. Vacuum carpets thoroughly, mop hard surfaces, and ensure you reach every corner. By following this methodical top-to-bottom approach, you will leave each room impeccably clean and ready for the next occupants.
Your future self will appreciate the thoroughness of this cleaning strategy.
Tackling tough stains and hidden grime requires targeted strategies and a bit of patience. According to U Removals, professional movers recommend specific cleaning agents for different challenging areas.
In the kitchen, focus on appliances that accumulate grease and grime. Use a UK-approved degreaser for ovens and tough kitchen surfaces. For limescale around taps and showerheads, Teka Cleaning suggests using natural solutions like white vinegar and bicarbonate of soda to break down mineral deposits effectively.
Walls and ceilings often get overlooked but can harbour significant dirt. Create a gentle cleaning solution using warm water and mild detergent. Test any cleaning mixture on a small hidden area first to ensure it does not damage paint or surfaces. Pay special attention to marks around light switches, door frames, and areas near cooking spaces.
Bathrooms and kitchens require extra care. Scrub grout lines between tiles using a mixture of bicarbonate of soda and water. For glass surfaces, use the classic trick of cleaning with vinegar and newspaper for a streak-free finish. This method not only cleans effectively but also leaves surfaces sparkling without residue.
Remember that patience and the right technique matter more than harsh chemicals. Work methodically and give cleaning solutions time to break down stubborn stains. Your thorough approach will ensure you leave the space looking immaculate for the next occupants.
The final step of moving out is ensuring every inch of your property meets the highest cleaning standards. According to Tenant Rights UK, a thorough final inspection can protect your deposit and prevent potential disputes.
Start with a comprehensive walk-through of each room. As recommended by Man with a Van, systematically verify that all areas are empty and meticulously cleaned. Check inside appliances, including ovens, fridges, and washing machines. Ensure all surfaces are wiped down and no personal items remain hidden in drawers or cupboards.
Pay special attention to often forgotten spaces like inside kitchen cabinets, behind toilet seats, window sills, and baseboards. Open windows and check for any lingering odours that might suggest incomplete cleaning. Compare the current state of each room against your initial inventory to ensure you have met all cleaning requirements.
Document everything. Take dated photographs of each room from multiple angles. These visual records provide crucial evidence if any disputes arise during your check-out inspection. Photograph clean surfaces, empty spaces, and areas you have particularly focused on during your cleaning process.
Finally, review your tenancy agreement and ensure you have met all specified cleaning standards. Your meticulous approach will not only increase the likelihood of recovering your full deposit but also leave the property in excellent condition for its next occupants.
Moving house cleaning can be a daunting task, especially when you aim for a spotless result that protects your deposit and impresses future occupants. From preparing supplies to tackling stubborn stains and verifying every nook and cranny, the process demands time and care. If the thought of coordinating these detailed steps alongside relocating feels overwhelming, you are not alone.
Schott Removals understands these challenges and offers reliable, experienced moving services that ease the entire relocation journey. Backed by over 30 years in the industry, our family-run team provides tailored removals, packing, and storage solutions that help you focus on what matters most — leaving your old home immaculate and starting fresh in your new one. Our customers consistently praise our professionalism and support, as highlighted in our Testimonials Archives – Schott Removals and Testimonial Showcase Archives – Schott Removals.
Don’t let move-out cleaning add stress to your relocation. Take advantage of trusted expertise and get a free quote today at Schott Removals. Discover how our dedicated team can make your move smoother, so you can complete your move-out cleaning with confidence and peace of mind. Learn more through our Uncategorised Archives – Schott Removals and start your journey towards a spotless move-out now.
To create a cleaning schedule for moving house, break down your cleaning tasks by room and allocate specific time slots for each area. For example, dedicate one day to kitchen cleaning and another for bathrooms, ensuring you start at least a week before your move.
Gather essential cleaning supplies such as an all-purpose cleaner, disinfectant, microfiber cloths, and a vacuum. Ensure you have multipurpose items on hand; for instance, a mop and buckets for hard floors can significantly streamline your cleaning process.
To declutter effectively before moving, sort your belongings into four categories: Keep, Donate, Recycle, and Trash. Aim to tackle one room at a time, making quick decisions—if you haven’t used an item in the past year, consider letting it go.
To clean stubborn stains, use targeted cleaning agents suitable for the specific surfaces, such as a degreaser for kitchen appliances or white vinegar for limescale. Work patiently and allow solutions to sit for a few minutes before scrubbing to increase effectiveness.
Perform a thorough walk-through of each room to verify that all areas are clear and cleaned, examining often-overlooked spaces like inside cabinets and behind appliances. Document your cleaning with photographs of empty, clean spaces to serve as proof in case of disputes.
To increase the likelihood of getting your full deposit back, make sure you follow your lease cleaning standards closely and conduct a comprehensive final inspection. Check off all cleaning tasks against your original inventory and take photographs for your records.
Unit 20, Lingfield Point
McMullen Road,
Darlington
DL1 1RW
Telephone: 01325 487091
Email: info@schottremovals.co.uk